Patient portals are healthcare-related, secure websites that allow patients to interact and communicate with their healthcare providers, such as physicians and hospitals. Patient Portals give patients access to their health information so that they can take a more active role in their own healthcare.
Yes. The Patient Portal, and all data contained within, is completely encrypted, and HIPAA-compliant.
Fill out and submit this short form. We'll receive it, verify the request, and then send you an email with a link to activate your Patient Portal account.
Send an email with a detailed description of the issue that you are having, as well as your contact information, to: patientportal@familymedicineofwestfield.com, or use the contact form at the bottom of this page.
Open the email and click the registration link (expires in 5 days).
Visit : www.YourHealthFile.com from any web-enabled device.
Click the ORANGE Activate your account button above the User Login form. An Account Activation screen will display.
In the Username field, enter the temporary username from the email.
In the Password field, enter the temporary password from the email.
In the Patient’s Date of Birth field, enter your date of birth. You can type it in (i.e. 07/16/1990 ) or use the Date of Birth Picker.
Click the Activate Account button. Upon confirmation, the Update Account screen will display and you will be prompted to enter your desired account details. You will need to:
- Create your own username and password.
- Enter your email address. It must match the email address to whom we sent the Patient Portal Activation Email.
- Choose a Security Question.
- Enter a Security Answer.
- Check the User Agreement.
- Click: Update Account.
If you receive an error with the username, for example, please try a different variation of the username, as it may already be taken in our system.
A login box will appear. Enter the new username and password that you just created, into the white login fields (i.e., do not click the orange button again).
Click: Log In
You'll then be prompted to complete the MFA (Multi-Factor Authentication) section. Be sure to specify either Email or Mobile Phone as Primary.
Click: Submit
Then retrieve and submit the MFA code sent to your phone or email address, which should arrive within seconds.
Once this final step has been done, your Patient Portal dashboard will load.
Welcome to YourHealthFile. If prompted, please follow the on-screen Patient Registration instructions to set up your new YourHealthFile Patient Portal account.
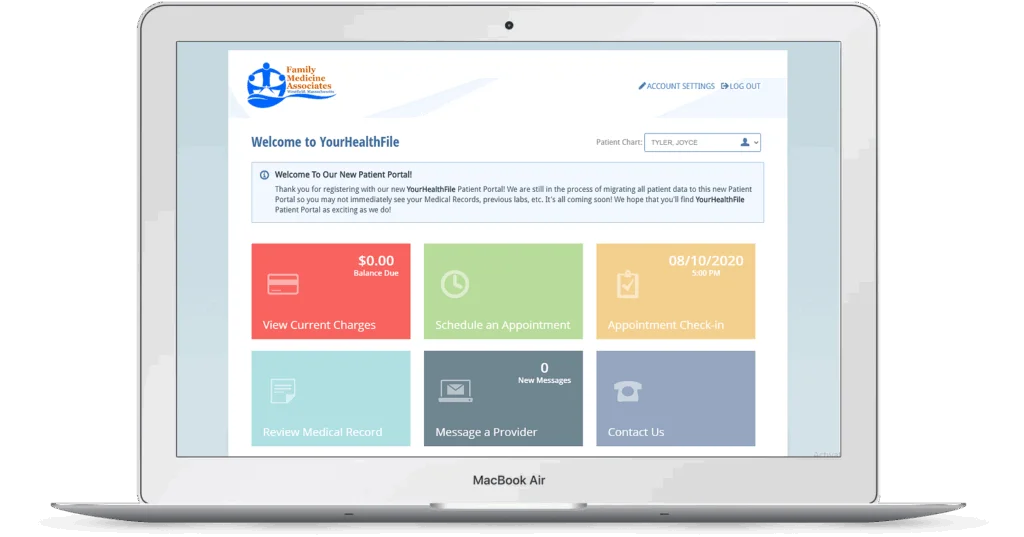
The Patient Portal landing page looks like this, below:
We also have tutorial videos on our website!
Multi-Factor Authentication (MFA) is a security process requiring patients to provide two or more verification factors to access their accounts. In our text message-based or email-based MFA, one of these factors is a unique code sent to your mobile device via text message or to your email. This code must be entered when an MFA-registered patient logs into their YourHealthFile Patient Portal account.
MFA Frequently Asked Questions:
- What should I do if I encounter issues while registering for MFA?
Reach out to your practice for assistance.
- Whom should I contact to reset my MFA?
Contact your practice for assistance with resetting your MFA.
- How can I change my MFA preferences?
Log in to the Patient Portal, navigate to the Account Settings tab, and select
Change MFA preferences to make changes.
- What should I do if I don’t receive the code promptly via mobile phone or email?
There is a 5-minute window for receiving and entering the OTP. If issues persist, log in again. - What happens if I don’t select the ‘Trust this device’ option?
You need to enter the OTP every time you log in to the Patient Portal.
- What occurs if I surpass the Maximum Number of Invalid attempts for the verification code?
You need to log in again, triggering a new code.
- What if I lack a mobile device for MFA?
Select Resend Verification Code Via Secondary option to receive the code through an alternative method and proceed with login.
Instructions
- All users are required to setup and login using MFA.
- Use the Trust this Device option to bypass the MFA requirement for a single device for 90 days.
- Verification code is valid for 5 minutes. Select Back to Login to start again.
- Users have 3 attempts to enter a valid verification code. After 3 failed attempts, select Back to Login to restart the process.
- If you are locked out or cannot access your registered MFA email and MFA mobile number, contact your practice admin to reset MFA.
- Note: Do not use the back button when interacting with MFA screens.
Contents
- MFA Registration - Patient Portal
- Logging in using MFA with Primary preference - Mobile Phone
- Logging in using MFA with Primary preference - Email
- Logging in using MFA with secondary preference
- Updating MFA Primary preference
- Trust this Device
- Verification Code expiration
- Exceeding the Maximum number of Invalid attempts
1. MFA Registration - Patient Portal
Step 1: Navigate to the NextGen Office login screen and enter your User ID and Password.
Step 2: Enter your mobile phone number and email for MFA, choose your primary method, and select Submit.
Note:
- Mobile phone MFA is supported only in the US. Outside the US, use email.
- The primary method selected will be used for future logins.
Step 3: Enter the verification codes and select Submit.
Step 4: After submitting, the user will be logged into the Patient Portal.
2. Logging in using MFA with Primary Preference: Mobile Phone
Step 1: Enter your credentials and select Submit.
Step 2: Enter the code received on your mobile phone and select Submit.
Step 3: You will be logged into the Patient Portal.
3. Logging in using MFA with Primary Preference: Email
Step 1: Enter your credentials and select Submit.
Step 2: Enter the code received via email and select Submit.
Step 3: You will be logged into the Patient Portal.
4. Logging in using MFA with Secondary Preference
If the primary method is unavailable, select Resend Verification Code Via Secondary option.
Step 1: Enter credentials and select Submit.
Step 2: Select Resend Verification Code Via Secondary option.
Step 3: Enter the verification code and select Submit.
Step 4: You will be logged into the Patient Portal.
5. Updating MFA Primary preference
After logging in, go to Account Settings and select Change MFA Preference.
Note: Updating MFA contact details here is not recommended.
6. Trust this Device
Step 1: Enter your login credentials.
Step 2: Enter the code, select Trust this Device, and click Submit.
Trust this Device will be reset if:
- You log in from a different device
- You use a different browser
- You reset your password
- You clear browser cache
- You have not logged in for an extended period
Note: Only trust devices that are personal and frequently used.
7. Verification Code Expiration
If the code expires (5 minutes), restart the login process.
8. Exceeding the Maximum Number of Invalid Attempts
If an invalid code is entered three times, restart the login process.
If this is your first time logging into the patient portal, please refer to the information below for help logging in:
Here is the link to the YourHealthFile® Patient Portal
You must have already activated your account to be able to use the login box on this website. If you have not yet activated your Patient Portal account, please fill out and submit this form as a first step.
No. Our Patient Portal is a mobile-responsive website, meaning it will format to any screen size. There is no app to download or install.
Recommended web browsers are:
- Google Chrome
- Mozilla Firefox
- Microsoft Edge
- Apple Safari
The Inbox is where you will receive communication from your provider and/or staff at Family Medicine Associates. For example, if you request medical record information, you will be notified in your inbox that it is ready to download or view through the portal, or any other instructions.
You will also receive electronic notification in your Inbox that lab results are available for viewing.
Other items you may see in your inbox:
- Unread messages
- Read messages
- Appointment Request response from staff
- Prescription Refill Request response from staff
- Documents sent from your provider or staff
- Forms to be completed
- Statement to be paid
- Educational materials related to your treatment
You can message our staff from your Patient Portal account to request your Medical Record and we're happy to help.
Alternately, there is much that you can do yourself: You can download our Medical Records Release Form if you need to request your records or provide this form to another provider/office to send us your medical records.
From your Patient Portal account, there are additional ways to view or download your medical records:
1: Once logged into your Patient Portal account, click the large tile named: Review Medical Record. The Patient Summary page should load. You can download your Summary on this page, see below. If you don't choose a date range, then the summary will start with the date that you became a patient.

2: You can see all of the individual records in your chart by going to the Documents menu in the Patient Portal. You'll see a list of each document with ability to view and download. They are likely in PDF format.
3: From Patient Account>Send My Record
You can either email or send, as Direct Message, a selection of your medical record (by date range) or your entire record. Please pay attention to the Privacy notice if choosing: email. You may need to contact staff for assistance with either of these two options.
If you are experiencing difficulty with the Date of Birth (Calendar Date Picker), you can simply enter your Date of Birth (DOB) into the Patient's Date Of Birth field manually, in the following format: MM/DD/YYYY
Username:
- Some patients have attempted to enter a space somewhere in the username, and spaces are not allowed.
- Username must be between 5 and 20 characters in length. Username must be unique. If it already exists in the system (i.e., another patient is using the same username), the username will not be accepted. In this case, try a different version of the username.
- If you are locked out of your chart: In this case, you will be required to create a new username.
Password: Must be between 8 and 20 characters in length.
Forgot Username or Password:
If you have forgotten your username or password, then from the main patient portal login page, click Forgot username or password? (under the login box). You'll be emailed your current username or a link to reset your password.
Sometimes staff will email you with a temporary username, password, and detailed instructions to activate your account. Both can have many characters, and we recommend using Copy & Paste to enter both, rather than attempting to type in manually.
Another reason that the temporary username and password do not work is because some patients do not follow the instructions to first click the Orange Button at the top of the page, but instead proceed to enter their (temporary) login into the Login fields below.
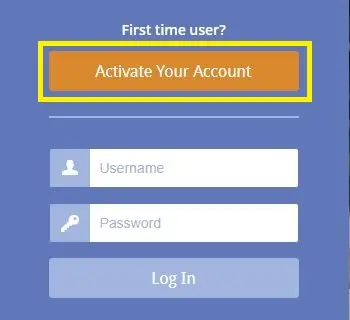
This is a known issue affecting some iPhones depending on screen size and iOS version. The issue is, at the point where you choose your Date Of Birth, iOS is blocking some of the bottom of the screen with pop up features, and is blocking the area where you would see the orange button to activate the account. You can usually get around this by manually entering your DOB into the field in the format: MM/DD/YYYY, then if Activate is visible, tapping it.
If this is not possible, we recommend you activate your account on a desktop PC or Mac OS X.
See the image, below.